Use the Power Platform to control Azure DevOps Pull Requests
/As I didn’t blog that much the last few months I thought it to be fitting to use this years Azure Back To School event to do two submissions. So this is my second submission in this wonderful community event! If you are a content creator in any way or like to share your knowledge with others then I can really recommend participating next year!
Now on to the topic of this blog. Recently I’ve been chosen as the Product Lead for the automation + Power Platform + AI propositions of the transformation department of the company I work for. This means that I’ve been thinking a lot about how tools like the Power Platform can be utilized in different ways. We all know how it can be used to enable citizen developement. So in this blog I want to use the Power Platform as a way integrate in a specific process and make this more accessible.
I’ve seen many situations where a company has a team of developers which use the GitHub flow. This means that code is created and then a Pull Request is created to review this code and if approved be merged into the main branch from where it’s pushed to production.
These flows are used for more then software packages, it’s also used in processes like Infrastructure as Code and other things. I’ve noticed that in many situations when code is done there are multiple steps that need to be done before it can really be pushed to production. Examples of these steps are:
Create a (internal) publication to let users know changes will happen
Schedule a maintenance window with specific groups
Inform the support desk of the new releases
Update marketing material with new features
Many of these steps need to be performed by people who are not developers. Depending on how the deployment is set up it can be difficult to manage all these tasks correctly.
It is possible to create a deployment pipeline where these steps are set up as approvals but this could result in multiple deployment being queued and waiting for approval creating a confusing situation where the main branch is not representative of the production environment.
To prevent this you can create a pull request template in Azure DevOps or GitHub. Inside this template you can create a checklist of items which need to be done before the merge is allowed to be completed. This is what I’ve seen many organization do and it works okay. It does create some slow downs as someone need to check if the tasks are being completed and only after that manually complete the pull request.
Personally I don’t like it when there are manual tasks and I would like developers to be developing as much as possible and not bother chasing these tasks to check if they are done. You could ask the other people to check new pull requests and if they are there pick up the tasks, but many find tools like GitHub or Azure DevOps very complicated. So I would like to propose a solution here using pull request workflow extension in Azure DevOps. By using the Azure DevOps REST API we can create extra checks in a pull requests which can be controlled with this API. In this blog I show you a simple setup I’ve made where this check is controlled from the Power Platform.
To achieve this first I created a Consumption Logic App in Azure. This logic app has a http request trigger.
This trigger contains the following schema:
"type": "object",
"properties": {
"subscriptionId": {
"type": "string"
},
"notificationId": {
"type": "integer"
},
"id": {
"type": "string"
},
"eventType": {
"type": "string"
},
"publisherId": {
"type": "string"
},
"message": {
"type": "object",
"properties": {}
},
"detailedMessage": {
"type": "object",
"properties": {}
},
"resource": {
"type": "object",
"properties": {
"repository": {
"type": "object",
"properties": {}
},
"pullRequestId": {
"type": "integer"
},
"codeReviewId": {
"type": "integer"
},
"status": {
"type": "string"
},
"createdBy": {
"type": "object",
"properties": {}
},
"creationDate": {
"type": "string"
},
"title": {
"type": "string"
},
"description": {
"type": "string"
},
"sourceRefName": {
"type": "string"
},
"targetRefName": {
"type": "string"
},
"mergeStatus": {
"type": "string"
},
"isDraft": {
"type": "boolean"
},
"mergeId": {
"type": "string"
},
"lastMergeSourceCommit": {
"type": "object",
"properties": {}
},
"lastMergeTargetCommit": {
"type": "object",
"properties": {}
},
"lastMergeCommit": {
"type": "object",
"properties": {}
},
"reviewers": {
"type": "array"
},
"url": {
"type": "string"
},
"_links": {
"type": "object",
"properties": {}
},
"supportsIterations": {
"type": "boolean"
},
"artifactId": {
"type": "string"
}
}
},
"resourceVersion": {
"type": "string"
},
"resourceContainers": {
"type": "object",
"properties": {
"collection": {
"type": "object",
"properties": {
"id": {
"type": "string"
},
"baseUrl": {
"type": "string"
}
}
},
"account": {
"type": "object",
"properties": {
"id": {
"type": "string"
},
"baseUrl": {
"type": "string"
}
}
},
"project": {
"type": "object",
"properties": {
"id": {
"type": "string"
},
"baseUrl": {
"type": "string"
}
}
}
}
},
"createdDate": {
"type": "string"
}
}
}
This schema is based on a Azure DevOps Webhook. Before we look at the rest of the logic app let me explain why you need this schema. When a developer creates a pull request our goal is to add specific checks to this pull request, this can be achieved with this logic app. To trigger it we could use the Azure DevOps connector, but in this blog I will use a different way so you could also use this in other kind of systems which don’t rely on the connectors.
In Azure DevOps you can go to the project you want to set this up in and go to the project settings. Under the general settings you can find the “Service Hooks”. Here you can create a new service hook of the type Web Hooks:
Set the trigger type to “when a pull request is created”. You can also apply it to only specific branches or repositories in your project if you want. In the next screen enter the url of the trigger. If you don’t see a trigger in your logic app yet then save the logic app (you can do this with just the trigger). it will then show you the url.
Now every time a pull request is created your logic app will be triggered.
Before we continue looking at the logic app let’s also create a custom table in the Dataverse.
This table we’ll use to store the different pull requests and store if they are approved or not.
I’ve renamed the default primary column to be named ID and set this to autonumber. This way I don’t have to provide that. The column Approved also got a default value of “false” so this doesn’t have to be provided when creating a record.
Now let’s look back at the logic app, I’ve added a small delay of 1 second in my logic app as we also are going to write things back to the pull request and due to caching and multiple servers it’s possible that sometimes when you try to write back with the API it can’t find the pull request yet. So adding a small delay will prevent this.
After the delay I first write a value to the Dataverse this is used to create an entry for this pull request which I can later user in my Power App.
I use here the http connector instead of the dataverse connector to show how you can add an entry using an Azure Managed Identity. This way you don’t have to create any service principal, it’s done for you. But at the moment of writing the connector doesn’t support this (yet). To handle the authentication you select the Managed Identity type and select the identity. I’ve created a user assigned managed identity because I’m going to use this in more than one logic app, so this way I only have to give permissions to one identity in the power platform.
To make sure it works you need to add the audience “https://<YOUR ENVIRONMENT>.crm4.dynamics.com”.
To make sure this managed identity has permissions to change settings in your dataverse table you need to give it permissions. You can do this by creating an app user in your environment.
If you click App you can look for the managed identity, do keep in mind that the ID which is shown in the Logic App wont work in this search box. In the Logic App blade for managed identities the objectID is listed but you can’t search for that in here. So make sure you search by name or a different ID.
The next step in our Logic App is to create a custom status for the azure devops pull request.
I use the REST API call where the ID is used that is taken from the Trigger (this information was send with the webhook).
"state": "pending",
"description": "TestState Pending",
"context": {
"name": "TestState"
},
"targetUrl": "https://www.autosysops.com"
}
the state is what describes if the check is done or not, in the API documentation you can find all valid states. The description and name can be any value and will be shown in Azure DevOps. The targetUrl can be very usefull as it will have you jump to this addres when you click on the check. If you create a power app to managed this I would recommend to change the url to the url of the power app eventually.
Just as with the http call to the dataverse we use a managed identity here. To make sure this one works we need to add the audience “499b84ac-1321-427f-aa17-267ca6975798”. This is a build-in ID from microsoft.
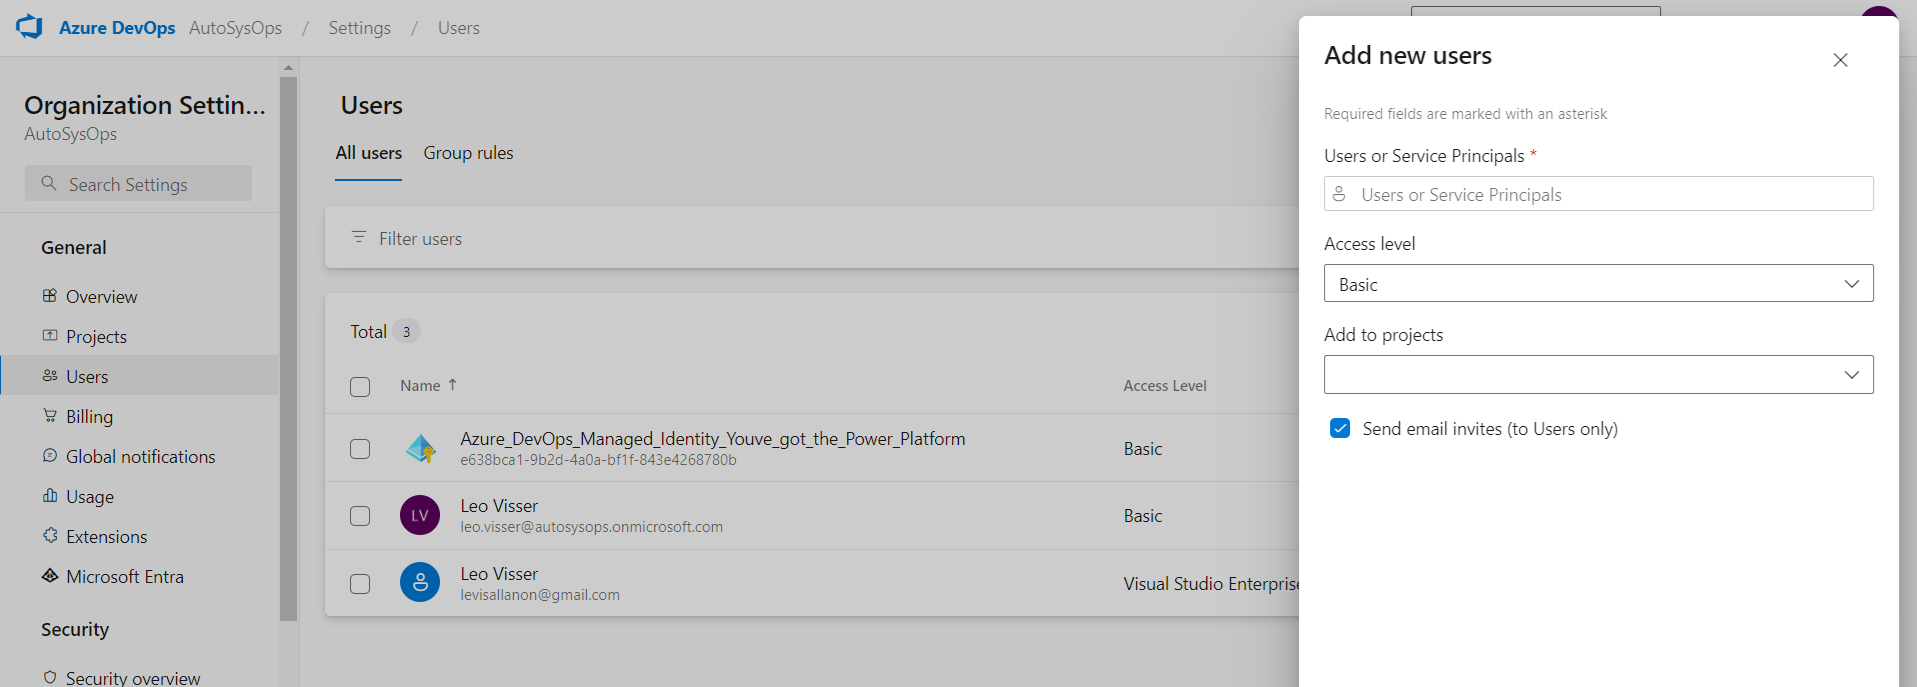
To make sure the managed identity has permissions we need to add it as a user to our organization. This can be done in the organization settings. Search for the user and provide it with a license. Now you can give it permissions, in my case I’ve just added it to the team for the project, but preferably you want to only give it permissions it need.
Now the last part of the logic app is just to return a 200 OK value so the webhook knows the submission was successful.
The next thing is to give users the ability to change the approved field. I recommend doing this with a Power App but you can use other tools too. I’ve created a simple canvas app shown here:
I’ve created a gallery in the power app with the items refering to the custom dataverse table we made before. It’s showing the title of the pull requests.
The button in front of it does a patch command to the data source to set approved to true with this expression:
Patch(PullRequests,ThisItem,{Approved: true})
So now the user can list all the pull requests and approve the check we made. Here you can build your own logic around it and expand on this. There is still one step we need to do though.
We need to create another logic app like this:
This logic app will trigger when a row is modified in the custom table we made. Here I use the dataverse connector. You could do this in many different ways too but I used the connector here and had it create a service principal for me to make the connection.
If the field approved is true we send a http request to the Azure DevOps REST API. This is the same as in the other logic app but here we give the state succeeded.
Now if you create a pull request the check will be added and set on pending. Once you approve it in the logic app you’ll se the check go to green in azure devops like this:

Now I recommend to also set up a branch policy in Azure DevOps to set this check as required. That way you could set your pull request to auto complete and once all checks are done it will merge automatically.
With this you linked Azure DevOps and Power Platform together. I hope this will help you to create these connections and if you have any questions about this feel free to reach out to me!