Enhance your SharePoint data with Azure AI tools
/It’s that time of year again! It’s time for the Azure Back To School! During this month many community members will contribute their knowledge so don’t forget to check out the site often for new content!
Recently I had a customer ask me if they couldn’t use AI to enhance the metadata of some of their files. In the current process someone would manually open the files and look for certain values and add these as metadata columns in SharePoint.
The screenshot above shows how these columns can look. To test their idea I made this setup where I have some quotes (the Dutch word for that is “Offerte” so that’s why you’ll see that word in the screenshots). Some values I want to extract from them might be the total amount quoted and the totals hours quoted, and I might also want to have the name of the customer.
If the organization was completely standardized this wouldn’t be a problem. We could make a script to find the data in the exact spot in the documents and add this to the metadata columns. But with things like quotes or other documents it’s often the case that they aren’t all the same. To simulate this I had a generative AI generate me some sample quotes I could use in this experiment. Below I will show some screenshots of different quotes and how they are structured.

Quote 1
Quote 2

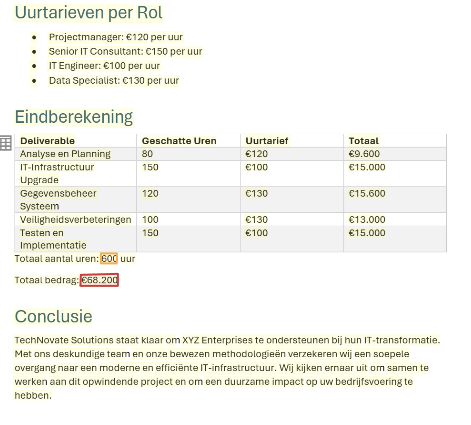
Quote 3
In the screenshots above the total amount of hours and the total cost have been marked. As you can see every quote has a slightly different way of showing this total. To make a system which can handle all of these different cases I decided to use Azure AI Document Intelligence. With this tool an AI can be trained with just a couple of documents, after it you can have it analyze and extract data using that model.
To do this I first created an Azure resource for the document intelligence. After that I went to the Azure AI Document Intelligence Studio (https://documentintelligence.ai.azure.com/studio/). Here you can use pre-build models for some common types of documents but I went for the “Custom extraction model”.
Here I’ve created a project that is linked to the resource I created earlier.
Using Document intelligence is fairly simple. First you go to the “Label data” screen. There you can upload several documents. To make it work you need at least 5 documents. It’s advised to make sure you have a type of document for every case you can encounter. Once you upload the document you click the “Run layout” button. This will use OCR to analyze the document and extract the text and lay-out from the document which Document Intelligence will use. Inside the documents you can use the interface to create fields. These are the types of values you want to extract. Once you created a field you can select a part of the text and mark this as this field.
After you’ve done this for every file you want to add to your trainings-set you can click the “Train” button in the top right. This will train the model (this can take a short while). Once the model is created it will show up in the model overview. You can always later add more documents to your label data and train the model again incase for example when new edge cases have been found. Inside the studio you can use the “Test” tab to upload documents and see what result you will get. But we want to automate this process!
So to do this I’ve create an Azure Logic App to automate this. Using a Logic App allows me to easily create this without the use of coding because it has a lot of build-in connectors. It also has a connector for Azure Documents Intelligence. I’ve created this simple flow:
This flow will trigger once a document is uploaded in the specified SharePoint location. Once it’s triggered it will retrieve the full file and then run the document intelligence job.
Here you see the name of the model is given. In my case that is “Offertes2” (as you can guess there was also a version 1). You can then also provide the file content or a url for the content. I choose to use the file content option as that allows me to easily pass the attribute from the SharePoint job in here.
If this job runs it will return a big JSON message. For our purposed we are interested in the “_fields” part as shown below:
{
"fieldName": "TotalPrice",
"fieldValue": {
"type": "number",
"valueNumber": 175,
"content": "€175.000",
"boundingRegions": [
{
"pageNumber": 2,
"polygon": [
1.7433,
6.7706,
2.3626,
6.768,
2.3633,
6.9404,
1.744,
6.9429
]
}
],
"confidence": 0.96,
"spans": [
{
"offset": 2416,
"length": 8
}
]
}
},
{
"fieldName": "TotalHours",
"fieldValue": {
"type": "number",
"valueNumber": 1300,
"content": "1300",
"boundingRegions": [
{
"pageNumber": 2,
"polygon": [
2.2612,
4.4715,
2.5704,
4.4715,
2.5704,
4.6286,
2.2612,
4.6286
]
}
],
"confidence": 0.915,
"spans": [
{
"offset": 2011,
"length": 4
}
]
}
},
{
"fieldName": "CustomerName",
"fieldValue": {
"type": "string",
"valueString": "heer/mevrouw,",
"content": "heer/mevrouw,",
"boundingRegions": [
{
"pageNumber": 1,
"polygon": [
1.5667,
2.9277,
2.5856,
2.9404,
2.5836,
3.1026,
1.5647,
3.09
]
}
],
"confidence": 0.793,
"spans": [
{
"offset": 118,
"length": 13
}
]
}
}
]
As you can see it provides you with the fields you created and the value it thinks fits to this field. It will also give you a confidence score that is between 0 and 1. You can use this confidence score to for example create a process where when the score is below a certain threshold you trigger a manual review of the file (and afterward add the manual review file to the trainings-set).
The last step in my flow will take the values from these fields and add them to the file in SharePoint as metadata. You’ll see a condition and loop here. That is because technically you could send multiple files to the connector, so therefore it will provide the answer in an array. The condition is to check if the values have been changed since the last time. Because I’ve made my trigger to trigger once a document is created or edited, so once the metadata is edited it will trigger the flow again. This can also be fixed with conditions in the trigger, but for my case I opted for this as the customer wanted to know what would happen if they changed the documents.
With this technique you can automate the extraction of metadata from your files in SharePoint and have them automatically added. Don’t forget to check out the Azure Back to School initiative for many more contributions from the community!